Open sudo config file
visudo
Go to the end of the file and uncomment %wheel ALL=(ALL) ALL line, it is located about 10 line above from the end of the file.
This change will activate the wheel group, and allow you to add a user to the wheel group (it is like local admin group in windows)
Save the change and close the file
add a user to the wheel group, in this example add a user called test to the wheel group
usermod -a -G wheel test
Friday, June 01, 2012
Configuring an NTP Client
open ntp.conf and edit it
nano /etc/ntp.conf
check status of ntpd service
service ntpd status
if it is not running start the service
service ntpd start
nano /etc/ntp.conf
check status of ntpd service
service ntpd status
if it is not running start the service
service ntpd start
Wednesday, May 30, 2012
CentOS 6 How to renew DHCP and restart NIC
To release the DHCP address on the system
dhclient -r
To obtain a new address
dhclient
To check the new IP
ifconfig
To restart network service
ifdown eth0
ifup eth0
/etc/init.d/network restart
dhclient -r
To obtain a new address
dhclient
To check the new IP
ifconfig
To restart network service
ifdown eth0
ifup eth0
/etc/init.d/network restart
CentOS 6: Install Packages Via yum Command Using DVD / CD as Repo
Open up the repo file and edit
vi /etc/yum.repos.d/CentOS-Media.repo
read the content carefully
set enabled to 1
enabled=1
Might want to add file:///media/CentOS_6.2_Final on the baseurl
so baseurl would look like this after it is added, the last line woth bold idicated that it is added.
baseurl=file:///media/CentOS/
file:///media/cdrom/
file:///media/cdrecorder/
file:///media/CentOS_6.2_Final/
Install a package with only the CDROM repo
# yum --disablerepo=\* --enablerepo=c6-media install pacakge-name
Thursday, August 18, 2011
How to Restore Default Error Pages in IIS7
Well it happend to me today, I accidently deleted the Error page 403!

It says inherited, so I tried to find how I can inherite from the top site, no luck. I even removed HTTP Errors and re-added...no luck
I manually created 403, its "Entry Type" was set "local" and I got 500 error when I try to open the site.

Finally I looked at the web.config

howa,,,there it is

I removed it, and refreshed the iis...yahoo
I got my 403 back!

That was dumb, but I am glad it is fixed!
Monday, December 13, 2010
Disk Partition Alignment Best Practices for Exchange 2010 server
Disk Partition Alignment Best Practices for Exchange 2010 server
1. For Exchange 2010 Database, it is recommended that the size of elements within a RAID stripe be set 512K for best performance.
2. Windows NTFS allocation unit size for Exchange 2010 database partitions should be set to 64K for best performance. For log partitions, if separated from database, the default allocation unit size should be used.
3. To see current settings run the following command, check bytes per cluster
fsutil fsinfo ntfsinfo <drive letter>
4. How to format a new disk:
Make sure your RAID stripe is 512K
and run this command on command prompt
Diskpart
list disk
select disk
create partition primary align=1024
assign letter=
format fs=ntfs unit=64K label="
Example:
C:\>diskpart
Microsoft DiskPart version 6.0.6001
Copyright (C) 1999-2007 Microsoft Corporation.
On computer: ASPIRINGGEEK
DISKPART> list disk
Disk ### Status Size Free Dyn GPT
-------- ---------- ------- ------- --- ---
Disk 0 Online 186 GB 0 B
Disk 1 Online 100 GB 0 B
Disk 2 Online 120 GB 0 B
Disk 3 Online 150 GB 150 GB
DISKPART> select disk 3
Disk 3 is now the selected disk.
DISKPART> create partition primary align=1024
DiskPart succeeded in creating the specified partition.
DISKPART> assign letter=F
DiskPart successfully assigned the drive letter or mount point.
DISKPART> format fs=ntfs unit=64K label="MyFastDisk" nowait
References:
http://technet.microsoft.com/en-us/library/dd758814(SQL.100).aspx
http://www.dell.com/downloads/global/solutions/security/Dell_PV_MD1200_7200_Mailbox_Resiliency_Exchange_2010_Storage_Solution.pdf
http://technet.microsoft.com/en-us/library/ee832792.aspx
Thursday, July 01, 2010
Blackberry Server 5 and Exchange MAPI CDO, and Windows 2008 Domain controller
It has beed nothing but fun after I upgraded BES 4 to 5.
Most painful problems are :
besadmin keeps loosing connections to exchange server.
After BES 5.0 SP1 gets installed, I could not login to BES admin web site.
I opened a ticket with RIM and spent almost a month with them hoping they could figure them out and finally I figured out and fix them by myself.
I like to share how I fixed it so you don't have to spend a month with useless RIM support.
First check your MAPI CDO's version if it is either 6.5.8147 or 6.5.8153, you need the newest MAPI CDO. Those MAPI CDO has unexpected crash problems. Check this website for more information: http://blogs.msdn.com/b/stephen_griffin/archive/2010/04/29/updated-mapi-download-fixed-crashes.aspx
and if you upgraded domain controllers to Windows 2008 servers, GC will refust many connections from the BES and resutling slow email delivery and many pending messages on BES.
This is part of the error on BES : {0x4EC} CDO initializing failure in CDO helper
The information store could not be opened. [MAPI 1.0 - [MAPI_E_LOGON_FAILED(80040111)]]
To fix this issue, take a look at this M$ KB2019948
http://support.microsoft.com/kb/2019948
Windows Server 2008 GC’s have a limitation of 50 concurrent NSPI connections per user.
Applications such as Outlook 2007, Blackberry Enterprise Server, or any application that will create multiple NSPI connections to a DC/GC can experience these symptoms.
-To fix login failure issue after BES 5 SP1 gets installed
See RIM KB20406
Here is the SQL script to fix the particular issue, run it against BES 5 BESMGMT database
update dbo.BASTraits
set value = null
where traitid=0 and pluginid=111
How to get copy of NDR sent to your email address
On EMS run this command
Set-OrganizationConfig -MicrosoftExchangeRecipientReplyRecipient
Set-TransportConfig -GenerateCopyOfDsnFor
For example
Set-OrganizationConfig -MicrosoftExchangeRecipientReplyRecipient
Set-TransportConfig -GenerateCopyOfDsnFor
For example
Set-OrganizationConfig -MicrosoftExchangeRecipientReplyRecipient xyz@abc.om
Set-TransportConfig -GenerateCopyOfDsnFor 5.1.1,5.7.1,5.7.2,5.7.3
For more information about DSN messages: http://www.computerperformance.co.uk/exchange2007/exchange2007_ndr.htm
Tuesday, December 29, 2009
Installing Exchange 2010 - Part 6
Activating the Mailbox database copy.
From the Database Management, select Add Mailbox Database copy.

Select a target mailbox server

Adding..


Added

Verify the completion

On EXB2, mailbox copy has started.

Do the same for the EXB2/DB2

Isn't this easy?
From the Database Management, select Add Mailbox Database copy.

Select a target mailbox server

Adding..


Added

Verify the completion

On EXB2, mailbox copy has started.

Do the same for the EXB2/DB2

Isn't this easy?
Installing Exchange 2010 - Part 5
Let's setup a DAG
I will name the DAG as "DAG1" and its IP will be 192.168.1.10, and use EXF1 for the FSW.
Creating DAG with EMC is a bit problomatic, use powershell instead.
If you use EMC, DAG will grab a DHCP IP.
New-DatabaseAvailabilityGroup -name DAG1 -WitnessServer EXF1 -WitnessDirectory c:\dag1fsw -DatabaseAvailabilityGroupIpAddresses 192.168.1.10
Now DAG1 is created but there are no members

Let's add members

I will add EXB1 and EXb2.

They are added, from the database management tab, you can see the owner of the DB. currently EXB1 is the owner of the DB1 and EXB2 is the owner of DB2.


Next time we will activate Mailbox Databse Copy.
Installing Exchange 2010 - Part 4
Eventhough Microsoft does not recommand using WLB on Exchange 2010 servers, I will show you how to do it. Microsoft actually recommand using H/W load balancer such as F5.
I will assume you already have experiences on creating NLB on exchange 2003/2007 servers.
Installing WLB on CAS&HT servers.
1. Install "Network Load Balancing" feature on each CAS+HT servers.
2. Setup the NLB (in my case my nlb name is "webmail.demo.local"), exf1 and exf2 are the members, also add it to DNS.
3. set a new client access array using new-ClientAccessArray command, it will be used among outlook clients (MAPI) to connect to the exchagne 2010 servers.

4. Now associate the array with a database using set-mailboxdatabase command

Now when db1 user try to connect to exchange database using mapi protocol, they will be directed to use webmail.demo.local to connect.
Some admins may perfer using a different name for this, for example "outlook-connect" or etc.
To do that,
Add A record for the "outlook-connect", but use the same nlb cluster IP (webmail's IP in my case)
Create a new ClientAccessArray, and associate a DB with it.
Let's verify the setting.

Monday, December 28, 2009
Installing Exchange 2010 - Part 3
The two servers I will use to install CAS & HT servers are called EXF1 and EXF2.


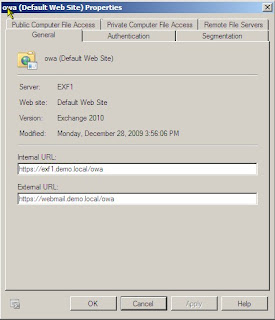
I will skip the prereq processes (eg: .net framework and etc)
1. For CAS and HT servers run following commands from the scripts folder/directory.
sc config NetTcpPortSharing start= auto
ServerManagerCmd -ip Exchange-Typical.xml -Restart
Click this link for more details on the command

2. Install exchange server, choose custom install and select CAS and HT roles.
3. Populate the internet facing server name (if your CAS&HT server will face the internet)

4. Install

5. Installed, internal URL will be changed once the load balance feature gets installed.

6. I will skip the installation process for the EXF2 (my second CAS&HT server)
Installing Exchange 2010 - Part 2
Name of the server I will install the first mailbox server is exb1
1. Start the setup, and choose language option


\


1. Start the setup, and choose language option

2. And install exchange server


\
Select mailbox role


3. First look of the EMC

Installing Exchange 2010 - Part 1
I am going to install exchange server 2010 on a server 2008 SP2, for more information on Exchange 2010 Prerequisites, see http://technet.microsoft.com/en-us/library/bb691354.aspx
1. Install .net Framwork 3.5 SP1, you can download the full package version from here
2. Install Windows Remote Management (WinRM) 2.0 and Windows PowerShell V2, download it from here
3. On servers that will host the Hub Transport or Mailbox server role, install the Microsoft Filter Pack. Download it from here
4. Run "ServerManagerCmd -ip Exchange-MBX.xml -Restart" from the scripts folder on a exch 2010 installation CD.

5. Prepare schema by running "setup /PrepareSchema"

6. Prepare AD by running "setup /preparead" (setup /PrepareAD will automatically perform the PrepareLegacyExchangePermissions )
7. Prepare domain
Run setup /PrepareDomain or setup /pd to prepare the local domain
Run setup /PrepareAllDomains or setup /pad to prepare all domains in your organization.
Exchange 2010
Exchange 2010 is out and there are a few information about how to create/setup high availablity features.
I am going to post how to setup exchange 2010 with DAG and setup load balanced CAS and HT servers.
I am going to post how to setup exchange 2010 with DAG and setup load balanced CAS and HT servers.
Saturday, October 11, 2008
Outlook calendar pemission getting reset issue
There is a case when a user wants to block his/her calendar (free+busy) information not to be announced to users in your organization.
They can block it by selecting calendar's permission to "None" for the default setting.
It gets set back to "free+busy" after about 24 to 48 hours later. it is done by BES (4.1.5 or later).
Disable the free+busy look up capability to prevent the problem.
Here is an instruction:
http://www.blackberry.com/btsc/search.do?cmd=displayKC&docType=kc&externalId=KB15162&sliceId=SAL_Public&dialogID=91835014&stateId=0%200%2091831361
* if you do it, users with handheld software version 4.5 or later can not perform free+busy lookup
Wednesday, October 08, 2008
Update Rollup 4 for Exchange Server 2007 SP1 is available
Update Rollup 4 for Exchange Server 2007 SP1
http://support.microsoft.com/?kbid=952580
A Note:
If you have Cisco Unity and exchange server 2007, you might experience IP phone's LED (Voicemail indicator lamp) won't syncronize when a user receives or deletes a message. This update, kb952580, will fix the issue.
This update rollup 4 for exchange 2007 sp1 includes 951251 (http://support.microsoft.com/kb/951251/): A MAPI application does not work correctly if Exchange 2007 is installed on a Windows Server 2008 server.
More information on what was really broken, take a lok at http://blogs.msdn.com/stephen_griffin/archive/2008/07/03/mapi-download-and-the-enumprotocols-bug.aspx
Also If you are using Blackberry enterprise server 4.1.3 or later with exchange server 2007, you might want to update CDO&MAPI on BES, this is optional, here is an instruction
http://www.blackberry.com/btsc/search.do?cmd=displayKC&docType=kc&externalId=KB14502&sliceId=SAL_Public&dialogID=192826523&stateId=1
On this instruction remove ESM 2003, and follow the instruction in full.
http://support.microsoft.com/?kbid=952580
There are a few possible installation issues that we would like you to be aware of:
1. Exchange 2007 managed services might time out during certificate revocation checks
2. When installing a Rollup, we recommend you use the same account that you used to install Exchange Server. If you are using a different account, that account needs to have Local Administrator rights as well as rights to read Active Directory on Exchange object as well as server level (as the update needs to determine which roles are installed on the server). Not having required permissions can lead to OWA not being updated correctly and displaying a blank page after update has completed.
3. If you have modified the logon.aspx file, it will not be patched by the Update Rollup installer. As a result Outlook Web Access may not be updated correctly and it may display a blank page after the update has finished. In order to avoid this problem, rename the logon.aspx file before applying the update rollup. After you apply an update rollup package, you must re-create Outlook Web Access customization in logon.aspx.
A Note:
If you have Cisco Unity and exchange server 2007, you might experience IP phone's LED (Voicemail indicator lamp) won't syncronize when a user receives or deletes a message. This update, kb952580, will fix the issue.
This update rollup 4 for exchange 2007 sp1 includes 951251 (http://support.microsoft.com/kb/951251/): A MAPI application does not work correctly if Exchange 2007 is installed on a Windows Server 2008 server.
More information on what was really broken, take a lok at http://blogs.msdn.com/stephen_griffin/archive/2008/07/03/mapi-download-and-the-enumprotocols-bug.aspx
Also If you are using Blackberry enterprise server 4.1.3 or later with exchange server 2007, you might want to update CDO&MAPI on BES, this is optional, here is an instruction
http://www.blackberry.com/btsc/search.do?cmd=displayKC&docType=kc&externalId=KB14502&sliceId=SAL_Public&dialogID=192826523&stateId=1
On this instruction remove ESM 2003, and follow the instruction in full.
Saturday, May 03, 2008
Migrating exchange 2003 clustered server environment to exchange 2007 sp1 using windows 2008 servers
Before I post detailed steps, here is a migration plan.
The 2x E2K3 OWA (NLB) and 2x E2K3 clustered backend servers will be replaced/migrated to
- 2x E2K7 SP1 CAS&HT (NLB)
- 1x E2k7 sp1 public folder server (LCR)
- 2x E2k7 sp1 (CCR) mailbox servers (CCR: 1 active and 1 passive)
0. Prep 2x windows 2008 server STD for CAS and HT, install IIS, NBL and etc.
1. Export IIS cert from the exchange 2003 OWA server, and import that to the windows 2008 STD servers.
2. Install exchange 2007 sp1 on windows 2008 server.
3. Create/modify E2k7 connectors, create routing connector to connect EVS1 and E2k7 CAS&HT server.
4. Remove e2k3 OWA servers.
5. Setup e2k7 sp1 STD public folder server (single mailbox server withot mailbox DB)
6. set OAB on e2k7 public folder server for old outlook users. replicate Public Folders.
7. Prep CAS&HT for witness server.
8. install e2k7 ENT CCR mailbox server.
9. migrate mailboxes
10. remove e2k3 server clusters.
11.Clean up AD using ADSI edit tool.
Tuesday, April 29, 2008
It has been a while
It has been a while since I posted the last post here, I have been busy figuring out how to migrate exchagne 2003 + windows 2003 R2 sp2 to Exchange 2007 sp1 on windows 2008.
It is going to be a very interesting post.
Check out this blog soon!
It is going to be a very interesting post.
Check out this blog soon!
Tuesday, March 04, 2008
How to enable Forms Based Authentication on Exchange 2003 OWA
I will assume you know how to use IIS and request and install SSL.
1. On one of the front end server, request and install SSL.
2. Open the IIS manager, find a "exchange" virtual directory and set Require SSL and Require 128 bit encription.
3. On Exhange Systems Manager, open the front end server.
4. Go to the protocol--> http, right click the http and open the properties for the Exchange Virtual Server.
5. Click settings tab, and check the "Enable Forms Based Authentication"
6. On the front end server, reset the iis or restart the server.
7. Try connect the owa using https://
8. On the front end server, start the IIS manager and export the cert.
9. on the second front end server, import the cert.
10. repeat #2 to #6 on the second front end server.
Subscribe to:
Posts (Atom)
