Since exchange 2007 become more popular I decided to start yet another series. In this series, I will show you how to:
1. How to use VMware virtual server to install 64bit OS, exchange server 2003 cluster.
2. Prep exchange 2003 for testing.
3. Install first exchange 2007 (CAS and HTR)
4. How to use 2007 OWA to access mailboxes in exchange 2003.
5. Install exchange 2007 NLB.
6. Install exchange 2007 back end clusters.
7. Migrating things
8. Removing exchange 2003.
Saturday, June 16, 2007
Friday, June 15, 2007
Step by step: Installing Antigen on Exchange 2003 cluster
1. On a active node, yes active node, install antigen 9.0
2. In the middle of setup it will ask for a shared disk's drive letter, don't put drive letter (exmaple X:), instead put name of the sharted disk, in our lab that is "Disk x:".
If you put actual disk letter (X:) you will receive
Failed to get EVS Info.GetMSCSEVSInfo: An Active node of an Active/Passive MSCS cluster is found, but not match for the shared drive is found.
3. Follow the instructions and finish.
4. Install Antigen on every active node.
5. Install Antigen on every passive node.
6. Done.
2. In the middle of setup it will ask for a shared disk's drive letter, don't put drive letter (exmaple X:), instead put name of the sharted disk, in our lab that is "Disk x:".
If you put actual disk letter (X:) you will receive
Failed to get EVS Info.GetMSCSEVSInfo: An Active node of an Active/Passive MSCS cluster is found, but not match for the shared drive is found.

3. Follow the instructions and finish.
4. Install Antigen on every active node.
5. Install Antigen on every passive node.
6. Done.
Step by step: How to install exchange 2003 cluster part XIIII
Simulating the quorum disk failure
1. Turn off both EXBE01 and EXBE02.
2. Edit each machine and remove the Quorum disk (Q:).
3. Start EXBE01 and EXBE02.
4. Cluster service won't start.
5. Turn off both EXBE01 and EXBE02.
6. Add a new SCSI shared disk.
7. Turn on EXBE01.
8. Format the new disk and lable it is as S:.
9. ON EXBE01, go to the "service" change "cluster" service to "manual".
10. From the command line execute "net start clussvc /fixquorum" .
11. Start the cluster admin GUI and add a new resource (physical disk) S: and assign it as a new quorum disk, and make groups online.
12. Change cluster service to "Automatic" start.
13. Reboot EXBE01, and check to see if the cluster is running.
14. Start EXBE02.
Saturday, April 28, 2007
Step by step: How to install exchange 2003 cluster part XIII
How to add more than 2 nodes.
1. You can't simulate this in this lab because MS vitrual server does not allow more than 2 channels on SCSI.
2. To do it on real world, keep both current nodes on.
3. On the third node, install OS, apply server service packs and patces.
4. Add it as a node, just follow steps as if you are adding the second node.
5. Install exchange server, add groups, this time EVS2.
6. Apply exchange SP, hot fix, security paches and so on.
7. EVS2 is set.
8. You now have 2 active and 1 passive node, make sure all nodes are possible ower of all the resources.
9. Keep doing this to add more active nodes, you can add up to 8 nodes (At least one node needs to be a passive)
If you don't create EVSx, that will be just a passive node.
* Make sure all nodes are identical, for example BIOS, iSCSI initiator, SCSI firmware, driver, exchange hotfix, virus scanner and etc.etc.................I mean everything!
To add third node in this lab. - I will be really brief
1. Don't try this unless you are really curiouse about how to do it.
2. Turn off the passive node. (I assume that is exbe02)
3. Create exbe03, use SCSI id 7 to add 2 SCSI cards. (that is why exbe02 needs to be shut off!), Whole cluster will share the same quorum, but evs2 will use a seperate disk for evs2!
Add the existing quorum to the first SCSI, and add a new disk to second SCSI. Add an extra network card too.
4. Turn on the exbe03, setup the OS , add it to the exch-cluster.
5. Format the new disk (second SCSI), install exchange (evs2, 192.168.1.10) and use it.
6. Don't turn on the exbe02, that might kill even the whole virtual server environment, setup heartbeat network too.
7. You now have two exchange servers (EVS1 and EVS2), but you can't fail over because you don't have any passive server, don't do this in the real world, that will be really stupid!
You now know how to create evs2, sort of.....
Step by step: How to install exchange 2003 cluster part XII
Simulate a network failure and recovery.
1. On the passive node, go to the "Edit configuration"
2. Change "Local Network" virtual network to "Not connected"
3. The passive node will reports that the nework lost connection.
4. Try to fail over, it should fail, but the active node knows that the passive server is alive.
5. Change "Not connected" to "Local Network" virtual network
6. Change the "HeartBeat" virtual network to "Not connected"
7. Try to fail over, it should work this time.
8. Enable the "HeartBeat" virtual network.
What happened?
Local network is mixed mode, and HeartBeat is dedicated heartbeat network.
The whole purpose of the heartBeat network is to make sure each node knows about others and prevent them from become active when "Local Network" fails.
As you can see, in this lab if both nodes try to be active, that would be a real disaster! and we prevented it.
There is a case you might need only "Local Network" which uses mixed mode. You might need it when you create a campus cluster or geo cluster. Hopefully you have at least 2 ISP and they can back up each other.
Step by step: How to install exchange 2003 cluster part XI
Simulate a node failure and recovery.
1. Delete one of the cluster node and evict the deleted node.
2. Copy and paste base machine and name it same as the deleted node.
3. Set network cards and SCSI shrade disks.
4. Add it as a node and install exchange server.
5. Apply server service packs, exchange service packs and etc.
1. Delete one of the cluster node and evict the deleted node.
2. Copy and paste base machine and name it same as the deleted node.
3. Set network cards and SCSI shrade disks.
4. Add it as a node and install exchange server.
5. Apply server service packs, exchange service packs and etc.
Thursday, April 26, 2007
Step by step: How to install exchange 2003 cluster part X
How to apply windows service pack and exchange servive packs?
Here is a brief instruction on how to install service packs or security patches on cluster enviroment.
1. Apply patches to the front end servers first. (In this lab they are exfe01 and exfe02, one at a time)
2. Apply patches to the current passive node (if exbe01 is active, exbe02 is passive, apply patch to exbe02)(You might have to stop "cluster" service on passive nodes).
3. Fail over exchange servers to passive node. (now exbe02 is active and exbe01 is passive)
4. Apply patches to the current passive back end servers. (exbe01)
5. You may can move exchange servers to original active node(make exbe01 as active node and exbe02 as a passive node) -> that is an extra downtime for users.
* You also want to follow the same procedure if you want to apply BIOS updates, driver updates and so on.
Wednesday, April 25, 2007
Step by step: How to install exchange 2003 cluster part VIIII
Let's create front end servers!
1. Prepare 2 servers, exfe01 and exfe02 using windows 2003 standard R2 base machines. You don't need any shared SCSI disks.
exfe01 : IP : 192.168.1.8, Subnet: 255.255.255.0, DNS :192.168.1.1
exfe02: IP : 192.168.1.9, Subnet: 255.255.255.0, DNS:192.168.1.1
Both machine will use "Local Network" virtual network.
2. Install exchange 2003 standard server (you can use enterprise edition for this lab) on each exfe01 and exfe02 (just run the "Run Setup Now"). You don't need to do domainprep or forestprep. Don't forget to install IIS, ASP.net, NNTP and SMTP before you install exchange servers.
3. From EXBE01, open Exchange System Manager.
4. Right click the EXFE01, and select "This is a front-end server", OK, and reboot.

5. Do the same on the EXFE02.
Setting up NBL
1. Login to the EXFE01.
2. Start -> Control Panel -> Network Connections -> Local Area Connection
3. Properties -> Enable "Network Load Balancing" -> Properties

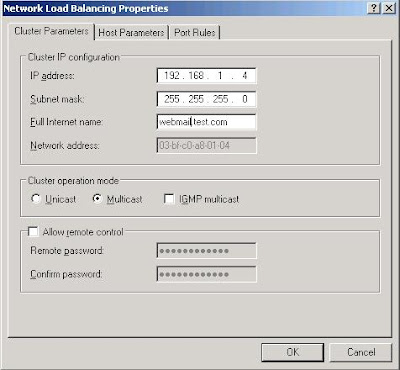
4. Cluster IP : 192.168.1.4, subnet : 255.255.255.0, Full Internet Name : webmail.test.com, Multi cast
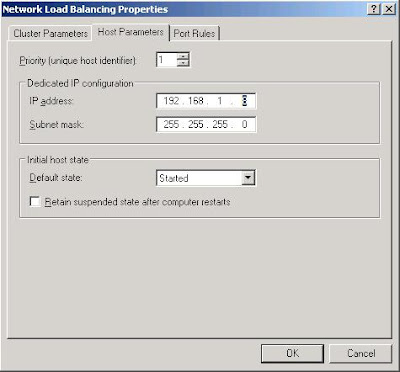
5. Priority:1 , IP address:192.168.1.8, Subnet Mask:255.255.255.0
6. OK.
7. Ok on the warning window.
8. Open the "Internet Protocol (TCP/IP) Properties.
9. Open the "Advanced"
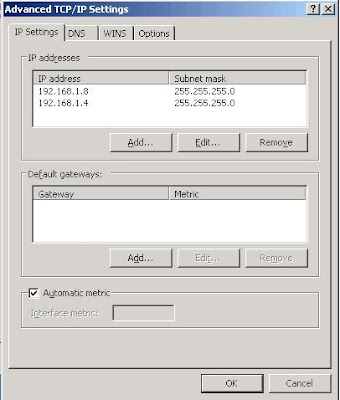
10. Add the cluster IP on the IP addresses and OK
11. Open the IIS manager, open the default website's properties.
12. change IP address to 192.168.1.4 and OK.
13. Do the same on EXFE02, but this time Priority is 2, Dedicated IP is 192.168.1.9
Test the NLB front end server.
1. Login to the DC
2. ping webmail.test.com, it should fail
3. Add a new DNS entry,
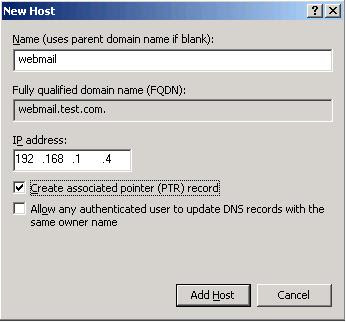
4. From the DC, open OWA by webmail.test.com/exchange. If you don't want to manage dns, just type 192.168.1.4/exchange to access the OWA.
Turn off one of the front end server and try to access the OWA.
You just created NLB exchange front end servers.
If you want to know more about deploying exchange on clustering environment
Visit this technet site.
http://technet.microsoft.com/en-us/library/bb123612.aspx
1. Prepare 2 servers, exfe01 and exfe02 using windows 2003 standard R2 base machines. You don't need any shared SCSI disks.
exfe01 : IP : 192.168.1.8, Subnet: 255.255.255.0, DNS :192.168.1.1
exfe02: IP : 192.168.1.9, Subnet: 255.255.255.0, DNS:192.168.1.1
Both machine will use "Local Network" virtual network.
2. Install exchange 2003 standard server (you can use enterprise edition for this lab) on each exfe01 and exfe02 (just run the "Run Setup Now"). You don't need to do domainprep or forestprep. Don't forget to install IIS, ASP.net, NNTP and SMTP before you install exchange servers.
3. From EXBE01, open Exchange System Manager.
4. Right click the EXFE01, and select "This is a front-end server", OK, and reboot.

5. Do the same on the EXFE02.
Setting up NBL
1. Login to the EXFE01.
2. Start -> Control Panel -> Network Connections -> Local Area Connection
3. Properties -> Enable "Network Load Balancing" -> Properties

4. Cluster IP : 192.168.1.4, subnet : 255.255.255.0, Full Internet Name : webmail.test.com, Multi cast

5. Priority:1 , IP address:192.168.1.8, Subnet Mask:255.255.255.0

6. OK.
7. Ok on the warning window.
8. Open the "Internet Protocol (TCP/IP) Properties.
9. Open the "Advanced"
10. Add the cluster IP on the IP addresses and OK

11. Open the IIS manager, open the default website's properties.
12. change IP address to 192.168.1.4 and OK.
13. Do the same on EXFE02, but this time Priority is 2, Dedicated IP is 192.168.1.9
Test the NLB front end server.
1. Login to the DC
2. ping webmail.test.com, it should fail
3. Add a new DNS entry,

4. From the DC, open OWA by webmail.test.com/exchange. If you don't want to manage dns, just type 192.168.1.4/exchange to access the OWA.
Turn off one of the front end server and try to access the OWA.
You just created NLB exchange front end servers.
If you want to know more about deploying exchange on clustering environment
Visit this technet site.
http://technet.microsoft.com/en-us/library/bb123612.aspx
Step by step: How to install exchange 2003 cluster part VIII
Let's create an exchange virtual server.
Yes, finally it is time to create an exchange server.
Here are things need to be happen before we can install the exchange server.
1. On both machine, install IIS also install ASP.net, NNTP and SMTP.
2. Open the cluster administrator and make sure exbe01 is the owner of both "cluster group" and "group 0"
3. Rename the "group 0" to EVS1, EVS stands for Exchange Virtual Server.

You are now ready to install exchange server. Let's do it
1. Insert exchange installation CD on exbe02. Yes EXBE02 ,not the EXBE01
2. On the EXBE02 (passive node), exchange server 2003 setup screen will show up. Select "Exchange Deployment Tools"
3. Select "Deploy the first Exchange 2003 server"
4. Select "New Exchange 2003 installation"
5. Go down to the #6 and click the "Run ForestPrep Now", warning message may show up, click continue twice.
6. Go through the license agreement and you will see "Component selection" window, next>
7. Next>
8. You should have a "Component Progress" screen now. It might take several minutes to finish.
9. Go down to the #7 and click the "Run DomainPrep Now", go through the setup process. It might take several minutes to finish.
10. Go down to the #8 and click the "Run Setup Now", yes I know this is exbe02 the passive node, when you install anythong on clusters, you have to perform installation on passive nodes first that includes server service pack, hot fix, security patches and etc.
11. Go through the installation process, it will install exchange server binaries and create the first exchange organization group on the Active Directory.
12. Once the setup is completed, move all groups (Cluster group and EVS1) to exbe02.
13. Login to exbe01 (now passive) and install exchange server, this time you don't have to run the the forestprep and the domainprep, just run "Run Setup Now".
14. You are now ready to create an exchange virtual server.
Let's create an exchange virtual server
1. Now all the required binaries to run the exchange server are installed on both nodes, but your cluster server is not using it yet, so let's make that happen.
2. Move groups (cluster group and evs1) to exbe01, now exbe01 is active.
3. Following steps can be done on any side, but I always do this on active node.
4. Right click EVS1 and New -> Resource
5. Name: EVS1 IP Address, Resource type: IP Address, Group : EVS1, Next>
6. Next>
7. Next> (You don't need any dependencies)
8. Address : 192.168.1.7, subnet : 255.255.255.0, Network : Local Area Connection, Enable "Enable NetBIos for this address", and Finish.
9. Right click EVS1 and New -> Resource
10. Name: EVS1 Network Name, Resource type: Network Name, Group : EVS1, Next>
11. Next>
12. Select "EVS1 IP Address" and add, Next>
13. Name: EVS1, Enable"Enable Kerberos Authentication", Finish.
14. Make them online. (Right click the "EVS1" group and select "Bring online")
15. If you check your DNS, you should see EVS1 (192.168.1.7)
16. Now create a Exchange SA resource, right click EVS1 and New -> Resource
17. Name : EVS1 ExchangeSA, Resource Type: Microsoft Exchange System Attendant, group: EVS1, Next>
18. Next>
19. Add "EVS1 Network Name" and "Disk X:", and Next>, Next>,Next> (cluster chose X: for exchange database for you), Finish.
20. Wow, did you see that, it just added a whole bunch! not just the ExchangeSA!!
21. Bring them online (Right click the "EVS1" group and select "Bring online")

Let's test the exchange server.
1. Login to the DC.
2. Open IE and type http://evs1.test.com/exchange , you might have to add *.test.com to your trusted site. Login as test.com\administrator
3. Wow, OWA is working...send an email to yourself.
4. If you have a time, you can create a XP machine and install office to test outlook application.
* In real world you want to add an extra disk to handle exchange server logs, and extra disk for each extra exchange storage group. Don't install outlook on any exchange server.
Next time let's create NLB front end servers.
Tuesday, April 24, 2007
Step by step: How to install exchange 2003 cluster part VII
Let's add exbe02 to the node.
Add "ExchangeQuorum" to SCSI 0 Id 0, and "ExchangeData" disk to SCISI 1 ID 0.
1. turn on the exbe02.
2. Login to the exbe02.
3. Settings for Local Area Connection 2 is as follows
Setting up the second NIC
1. Go to the second NIC's properties
2. IP : 192.168.100.1
3. Subnet Mask : 255.255.255.0
4. default gateway: leave it empty
5. Click the Advanced button
6. On DNS tab: Uncheck "REgister this connection's addresses in DNS
7. On WINS tab: Uncheck the "Enable LMHOSTS lookup
8. On WINS tab: Disable NetBIOS over TCP/IP
9. OK
Install MSDTC on the exbe02.
Open the Cluster Administrator
1. On Action : Add nodes to clsuter
2. Cluster or servername : exch-cluster -> OK
3. Add Nodes wizard will start
4. Next>
5. Verify that exbe02 is on "computer name" field, Add, and Next>
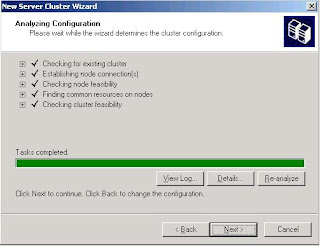
6. Analyzing configuration will start.
7. You should have all 5 check marks. Next>
8. Put password , Next>
9. View the log and Next>
10. On the next screen, it should give you a yellow ! mark, if you see it more closely, it would give you"Status 0x00138f: The cluster resource could not found" warning. That is because exbe01 is holding/controllong all the resources including Q: and X:. that is ok.
11. Next>
12. Finish
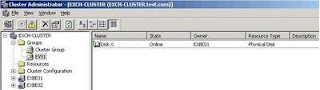
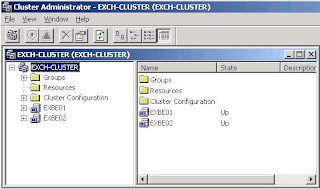
This is what you should see on the cluster administrator screen. make sure you have exbe01 and exbe02.
1. On the "cluster administrator" screen expand the "Groups".
2. Expand Cluster group.
3. It should look like this

4. Now right click the "cluster group" and select move group. (Or you can reboot the exbe01)
5. Owner of "Cluster IP address", "cluster name" and "Disk Q" should be exbe02.

6. If the cluster does not move, check if MSDTC is intalled on both servers, and check if "ExchangeQuorum" and "ExchangeData" disks are attached to both servers.
Let's config heartbeat network to use the private network. (you can do it from any server)
1. Right click the "Local area connection 2" from the "Cluster administrator" screen. It is under the "Cluster configuration" -> "Networks"
2. Properties
3. Select "Internal cluster communications only (Private network)"
4. OK.
5. If you see Local Area connection's properties it should say "All communications (mixed network)", leave it like that.
Now you have completed the first step to make exchange cluster.
Add "ExchangeQuorum" to SCSI 0 Id 0, and "ExchangeData" disk to SCISI 1 ID 0.
1. turn on the exbe02.
2. Login to the exbe02.
3. Settings for Local Area Connection 2 is as follows
Setting up the second NIC
1. Go to the second NIC's properties
2. IP : 192.168.100.1
3. Subnet Mask : 255.255.255.0
4. default gateway: leave it empty
5. Click the Advanced button
6. On DNS tab: Uncheck "REgister this connection's addresses in DNS
7. On WINS tab: Uncheck the "Enable LMHOSTS lookup
8. On WINS tab: Disable NetBIOS over TCP/IP
9. OK
Install MSDTC on the exbe02.
Open the Cluster Administrator
1. On Action : Add nodes to clsuter
2. Cluster or servername : exch-cluster -> OK
3. Add Nodes wizard will start
4. Next>
5. Verify that exbe02 is on "computer name" field, Add, and Next>
6. Analyzing configuration will start.
7. You should have all 5 check marks. Next>
8. Put password , Next>
9. View the log and Next>
10. On the next screen, it should give you a yellow ! mark, if you see it more closely, it would give you"Status 0x00138f: The cluster resource could not found" warning. That is because exbe01 is holding/controllong all the resources including Q: and X:. that is ok.
11. Next>
12. Finish
This is what you should see on the cluster administrator screen. make sure you have exbe01 and exbe02.

Let's Add MSDTC
1. right click the Cluster group, New -> resource
2. Name : MSDTC, Resource type : Distributed Transaction Coordinator
3. Next>
4. exbe01 and 02 should be already in the "Possible owner", next>
5. Select "Disk Q:" and "cluster Name" from the "Available resources" box and move that to "Resource dependencies" by clicking the "Add" button.
6. Right click the "MSDTC" and bring online.
Let's check if the cluster is set up correctly. (you can do it from any server)1. On the "cluster administrator" screen expand the "Groups".
2. Expand Cluster group.
3. It should look like this

4. Now right click the "cluster group" and select move group. (Or you can reboot the exbe01)
5. Owner of "Cluster IP address", "cluster name" and "Disk Q" should be exbe02.

6. If the cluster does not move, check if MSDTC is intalled on both servers, and check if "ExchangeQuorum" and "ExchangeData" disks are attached to both servers.
Let's config heartbeat network to use the private network. (you can do it from any server)
1. Right click the "Local area connection 2" from the "Cluster administrator" screen. It is under the "Cluster configuration" -> "Networks"
2. Properties
3. Select "Internal cluster communications only (Private network)"
4. OK.
5. If you see Local Area connection's properties it should say "All communications (mixed network)", leave it like that.
Now you have completed the first step to make exchange cluster.
Friday, March 16, 2007
Step by step: How to install exchange 2003 cluster part VI
Let's create clustered back end exchange servers.
* We will be using two 2003 r2 enterprise servers.
* It's IPs are 192.168.1.5 and 192.168.1.6
* We will create a private network for a heartbeat monitoring.
* It will use two shared SCSI disks. (Q: and X:)
1. Create two directories, name them as "exbe01" and "exbe02". (exbe = exchange backend)
2. Copy files under the "Windows 2003 R2 ENT - Base" folder to each "exbe01" and "exbe02" folders.
3. Open them on the VS admin web site, one by one, and go to "Virutal Machines" -> "Configure" -> "Windows 2003 R2 ENT - Base" , and change the machine names.
4. Do not start them yet.
5. Go to the top menu of the VS admin website.
6. Create a new network, this time call it a "heartbeat" and do not enable the DHCP.
7. On each machine add the "heartbeat" network.
- Visit the each machine's configuration and click network -> add -> select "heartbeat" -> ok
8. Add a new SCSI card to each machine.
Edit configuration -> SCSI Adapters -> select "Share SCSI bus for clustering"
exbe01 will use SCSI ID 6, exbe02 will use SCSI ID 7, add two SCSI adaptors each.
exch01 , Virtual SCSI adaptor 1 : ID 6 "Share SCSI bus for clustering"
exch01 , Virtual SCSI adaptor 2 : ID 6 "Share SCSI bus for clustering"
exch02 , Virtual SCSI adaptor 1 : ID 7 "Share SCSI bus for clustering"
exch02 , Virtual SCSI adaptor 2 : ID 7 "Share SCSI bus for clustering"
9. Create disks that will be used by shared SCSI cards. - Make sure both machines are off!
From the VS server admin web site, Virutal Disks -> Create -> Fixed size virtual disk.
Name the first HDD as "ExchangeQuorum" -> Size 1 GB.
Create another one this time name it as "ExchangeData" -> size 2GB, fixed size.
10. Change the configuration on exbe01, add the "ExchagneQuorum" disk to the first SCSI card (SCSI 0 ID 0).
11. Turn on the exbe01, leave the exbe02 off. -login to EXBE01
12. Setup the system
For the NIC 1 (Local Network)
IP : 192.168.1.5
default gateway : 192.168.1.1
DNS : 192.168.1.1
for the NIC 2 (heartbeat)
IP : 10.10.1.1
No default gateway, no DNS
Join the domain.
Initialize and format the disk 1 (1GB), this will become a quorum disk , give disk letter Q:, and label it as "quorum"
Initialize and format the disk 2 (2GB), this will become a exchange datbase and log disk , give disk letter X:, and label it as "exchange_db"
On the EXCH01
1. Go to the second NIC's properties
2. IP : 192.168.100.1
3. Subnet Mask : 255.255.255.0
4. default gateway: leave it empty
5. Click the Advanced button
6. On DNS tab: Uncheck "REgister this connection's addresses in DNS
7. On WINS tab: Uncheck the "Enable LMHOSTS lookup
8. On WINS tab: Disable NetBIOS over TCP/IP
9. OK
On the EXCH01
1. Start -> Administrative tools -> cluster administrator
2. On the "Open connection to cluter", on action "Create a new cluster" -> Ok
3. Next
4. Domain : test.com (or the name of domain you created), Cluster name : exch-cluster, and Next
5. Next (verify that Computer name has "EXBE01")
6. It will start to analize, when it is done you should see this screen.
* If you get a yellow ! mark, go back to the beginning of this article and verify your work, you might missed to initialize Q / X drive or NIC 2.
7. Next>
8. IP : 192.168.1.3
9. Username : administrator, and fill out the password ( in real world, you should create a service account that has capability of creating machine)
10. Check the proposed Cluster configuration and make sure it has Q: for the quorum.
11. Next>
12. On cluster is created click the Next> button.
13. Finish.
You just created the exch-cluster, that will manage your virutal servers.
Install MSDTC on the exbe01. It is under Add remove program -> Wdinows components ->Appliocation server ->"Enable network DTC access"
Next time we will add exch02 to the exch-cluster.
* We will be using two 2003 r2 enterprise servers.
* It's IPs are 192.168.1.5 and 192.168.1.6
* We will create a private network for a heartbeat monitoring.
* It will use two shared SCSI disks. (Q: and X:)
1. Create two directories, name them as "exbe01" and "exbe02". (exbe = exchange backend)
2. Copy files under the "Windows 2003 R2 ENT - Base" folder to each "exbe01" and "exbe02" folders.
3. Open them on the VS admin web site, one by one, and go to "Virutal Machines" -> "Configure" -> "Windows 2003 R2 ENT - Base" , and change the machine names.
4. Do not start them yet.
5. Go to the top menu of the VS admin website.
6. Create a new network, this time call it a "heartbeat" and do not enable the DHCP.
7. On each machine add the "heartbeat" network.
- Visit the each machine's configuration and click network -> add -> select "heartbeat" -> ok
8. Add a new SCSI card to each machine.
Edit configuration -> SCSI Adapters -> select "Share SCSI bus for clustering"
exbe01 will use SCSI ID 6, exbe02 will use SCSI ID 7, add two SCSI adaptors each.
exch01 , Virtual SCSI adaptor 1 : ID 6 "Share SCSI bus for clustering"
exch01 , Virtual SCSI adaptor 2 : ID 6 "Share SCSI bus for clustering"
exch02 , Virtual SCSI adaptor 1 : ID 7 "Share SCSI bus for clustering"
exch02 , Virtual SCSI adaptor 2 : ID 7 "Share SCSI bus for clustering"
9. Create disks that will be used by shared SCSI cards. - Make sure both machines are off!
From the VS server admin web site, Virutal Disks -> Create -> Fixed size virtual disk.
Name the first HDD as "ExchangeQuorum" -> Size 1 GB.
Create another one this time name it as "ExchangeData" -> size 2GB, fixed size.
10. Change the configuration on exbe01, add the "ExchagneQuorum" disk to the first SCSI card (SCSI 0 ID 0).
11. Turn on the exbe01, leave the exbe02 off. -login to EXBE01
12. Setup the system
For the NIC 1 (Local Network)
IP : 192.168.1.5
default gateway : 192.168.1.1
DNS : 192.168.1.1
for the NIC 2 (heartbeat)
IP : 10.10.1.1
No default gateway, no DNS
Join the domain.
Initialize and format the disk 1 (1GB), this will become a quorum disk , give disk letter Q:, and label it as "quorum"
Initialize and format the disk 2 (2GB), this will become a exchange datbase and log disk , give disk letter X:, and label it as "exchange_db"
On the EXCH01
1. Go to the second NIC's properties
2. IP : 192.168.100.1
3. Subnet Mask : 255.255.255.0
4. default gateway: leave it empty
5. Click the Advanced button
6. On DNS tab: Uncheck "REgister this connection's addresses in DNS
7. On WINS tab: Uncheck the "Enable LMHOSTS lookup
8. On WINS tab: Disable NetBIOS over TCP/IP
9. OK
On the EXCH01
1. Start -> Administrative tools -> cluster administrator
2. On the "Open connection to cluter", on action "Create a new cluster" -> Ok
3. Next
4. Domain : test.com (or the name of domain you created), Cluster name : exch-cluster, and Next
5. Next (verify that Computer name has "EXBE01")
6. It will start to analize, when it is done you should see this screen.

* If you get a yellow ! mark, go back to the beginning of this article and verify your work, you might missed to initialize Q / X drive or NIC 2.
7. Next>
8. IP : 192.168.1.3
9. Username : administrator, and fill out the password ( in real world, you should create a service account that has capability of creating machine)
10. Check the proposed Cluster configuration and make sure it has Q: for the quorum.
11. Next>
12. On cluster is created click the Next> button.
13. Finish.
You just created the exch-cluster, that will manage your virutal servers.
Install MSDTC on the exbe01. It is under Add remove program -> Wdinows components ->Appliocation server ->"Enable network DTC access"
Next time we will add exch02 to the exch-cluster.
Step by step: How to install exchange 2003 cluster part V
Let's build a Windows 2003 R2 Enterprise and re-use it.
1. From the VS Master status, Create a new machine and name it "Windows 2003 R2 ENT - Base"
2. Set it to use 512MB memory, and "Local Network".
3. Install 2003 R2 Enterprise edition and sysprep it.
4. Remove "Windows 2003 R2 ENT - Base" from the VS admin web site.
5. Done.
1. From the VS Master status, Create a new machine and name it "Windows 2003 R2 ENT - Base"
2. Set it to use 512MB memory, and "Local Network".
3. Install 2003 R2 Enterprise edition and sysprep it.
4. Remove "Windows 2003 R2 ENT - Base" from the VS admin web site.
5. Done.
Friday, March 09, 2007
Step by step: How to install exchange 2003 cluster part IV
Let's create a domain controller.
1. Create a folder "Windows 2003 DC" on your HDD and copy files under "Windows 2003 R2 STD - Base" folder to the "Windows 2003 DC" folder.
2. From the Virutal server admin website, Virtual Machines -> Add. (You need to be on the "Master Status" to see the menu)
3. Locate the "Windows 2003 DC" folder and add the virtual machine.
4. Create a new private network, go to the Master sataus -> Virutal Networks -> Create
- Virtual Network name : Local Network
- Network adapter on physical computer : None(guest only)
- Do not setup DHCP.
Click OK
5. Set the "Windows 2003 DC" to use the "Local Network"
- Edit configuration -> Network Adapters -> Connect to : Local network -> Ok
6. Turn on the "Windows 2003 DC" machine and go through the setup process.
7. Login and set a static IP
IP : 192.168.1.1
subnet mask: 255.255.255.0
Default Gateway:192.168.1.1
Prefered DNS server: 192.168.1.1
Ok
8. Let's setup a DC (We will put active directory and DNS and DHCP
9. Start -> All Programs -> Administrative tools -> Manage your server
10. Add or remove a role -> next
11. Typical Configuration for a first server -> Next
12. Active Directory domain name: test.com <- you can change it if you want to. for example john.com, mary.com and so on. this is your test lab anyway. 13. Next 14. On NetBIOS name screen : Next 15. On the Forwarding DNS queries, select "No, don't forward queries" (In real world this is the chance you can put DNS fwd) 16. On Summary of selections, Next -> Ok
17. It will configure DNS, DHCP and AD for you. easy huh?
18. System will reboot, it will take an awfully long time but that is typical for a DC. (when you reboot exchange server and DC at the same time, make sure DC boots up first and you can login to DC, and turn on exchange server. If not, exchange will not work)
19. Login with administrator's ID and password, from now on your administrator account is domain admin account. DCs don't have local admin account.
20. As soon as you logged in you will have this screen.

Read it carefully. Assign static IP has a red bar, because it was already done by you.
Next -> Finish.
21. You are done with DC.
Thursday, March 08, 2007
Step by step: How to install exchange 2003 cluster part III
Let's build a Windows 2003 R2 STD and re-use it.
1. On the Virtual Server Administration Website, select create under the "Virtual Machines".
2. Let's name it as "Windows 2003 R2 STD - Base" and give 512MB memory.
3. For the "Virtual Network Adapter" select "Not Connected".
4. And click the "Create" button.
5. Click the "CD/DVD" link. on this menu, select an ISO image of windows 2003 R2 std, if you dont' have one you can use host machine's CDROM ("Physical CD/DVD drive").
If you want to create an iso image (I recommand it) go to : http://www.magiciso.com this is a tool I use everyday.
6. Click OK
7. Turn on the machine by clicking the screenshot of the server. (it is not turned on yet, so you will have this little thumbnail below)

8. If you click the little screen shot again, you will get a Remote Control screen.
--To release the mouse, press the host key (which by default is the right ALT key).
9. Go through the installation process.
10. Once the installation is done, login to the machine and install the Virtual Machine edition by clicking the Click here to start Virtual Machine Additions setup link.
11. We will be using internal network so don't worry about patching it.
12. Do a sysprep.
13. Turn the machine off.
14. Locate the folder "Windows 2003 R2 STD - Base", this is your Windows 2003 R2 STD base machine. We will be using it to make a windows domain controller and exchange front-end servers(optional), remove the "Windows 2003 R2 STD - Base" machine from the VS 2005 admin website.
Step by step: How to install exchange 2003 cluster part II
Let's install M$ virtual server 2005 R2.
1. Install IIS with asp.net.
2. Run setup.exe for the virutal server 2005, you will get the screen below

3. Click the "Install Microsoft Virtual SErver 2005 R2" button
4. Accept the License Agreement and click next.
5. Put customer information and click next.
6. Select "complete" install and click next.
7. On the "Configure Components" take the default values and click next.
8. On the next window, click next.
9. On the next window, click install.
10. Click "finish"
To manage M$ VS 2005 R2, go to "Start -> All Programs -> Microsoft virtual server -> virtual server administration website"
Step by step: How to install exchange 2003 cluster part I
I will be using M$ virtual server 2005 R2, you can download it from M$ for free.
http://www.microsoft.com/windowsserversystem/virtualserver/default.mspx
The machine will hold the guest machines, will need lots of memory.
If you are going to do all the steps below, you will need windows 2003 R2 Ent & 5+ GB memory at least
If you are going to do skip step 6 and 7, you will need windows 2003 R2 STD & 4GB memory at least.
100G+ HDD is also needed.
This is what we are going to do.
- Install and setup M$ virtual server 2005 R2.
- Build a Windows 2003 R2 standard.
- Copy and use the Windows 2003 R2 Std to build a Windows domain controller.
- Build a Windows 2003 R2 Ent.
- Copy and use the Windows 2003 R2 Ent to build two node exchange 2003 back-end clusters.
- Copy and use the Windows 2003 R2 Std to build a exchange Network Load Balanced front end server. (optional)
- How to apply service packs / patches.
- Simulate a node failure and recovery.
- Simulate a network failure and recovery.
- How to add more than 2 nodes.
- Simulate a quorum disk failure and recovery.
Subscribe to:
Posts (Atom)
